Showing posts with label painting. Show all posts

Wednesday, October 19, 2011

My pretty little Entryway & DIY Trunk Bench

My entryway used to be boring. It was nothing special. It didn't say, "Hello there, friend. Please come in and be very welcome." It said nothing. Sadly (as you may have figured out if you've followed me much) I forgot to take a before picture. So all you get is this:


This was my attempt at an in-progress picture:) Lots and lots of tape.

Ok, and here's the after!


Don't you love my stripey wall?

Here's the breakdown:

:: Shelf- Hobby Lobby, where else? It was waaaay more than I normally spend on ANYTHING. Normally $100, at 50% off, I couldn't pass it up. Also funny is the fact that two of my close friends bought it at the same time...we all saw it at the same time and each separately thought, "MINE!".


:: Bench- I know you are all wondering.  This trunk is from Goodwill. I found it a few years ago while I was off at school. I paid a whopping $10 for it (a lot of money when you're a poor student;). I had the great idea one day to turn it into a bench. I said to myself, "Self, you don't know how to work a jigsaw." So I did the next best thing to DIY---MYHDIFY. As in, Make Your Husband Do It For You. I love having a handy man. So I just asked him (kindly) to make something pretty out of wood and this is what he came up with!


All I can tell you is that it is 4" high. And that he used a jigsaw. That's the end of my knowledge. Although I do know that he used some of those screw-hole-filler-inner things. You know, so it looks all professional (unlike I sound). Here it is after the foot was attached:

Uh-huh. I knew you knew what I was talking about. Those things.

I actually really loved all the writing on top.

So then (silly me) I painted the foot AFTER we attached it. I do not recommend this.

Then we got to making the cushion for the top. I found this sweet burlap at the B (thrift store). When I brought it home, I didn't realize that it had this awesome stenciled pattern on it! I'm assuming it was for some type of embroidery or something.

It was a full circle, so I still have some left. I love it!!

So all we did was cut out some plywood for the seat, cover it in batting and then wrap it and staple. We did set this beast on top of it while we wrapped and it made a BIG difference in how tight we got the fabric.


This thing probably weighs 50 lbs.

BEFORE you upholster your seat, make sure you have holes drilled where you want your buttons to go.
After the cushion was wrapped, I picked out my cutie little buttons and, using crafting wire (really thin), "sewed " them on.. We used a straight piece of thicker gauge wire to act as an anchor on the backside of the board.

Aren't these to die for? I bought a big lot of buttons on eBay for $5.99 including shipping!

This is the cushion after it's been buttoned.

Oh goodness, it's love.


And here's the finished product!


Ahhh. Entryway perfection. Now it says, "Come in. Make yourself at home. Sit your butt on me and take your shoes off." Linking up to: Somewhat Simple
Transformation Thursday

HookingupwithHoH

Thursday, September 29, 2011

DIY Chandelier

Hi my name is Rachelle and I have a Chandelier addiction. Can you be addicted if you've never had one?

This was what used to hang in my living room:
Oh sweetness. That is hideous. 
Something had to be done. I had seen chandeliers online and in antique stores going for $150+...way over my teeny budget. What is a DIYer to do? I think you know. I knew that I wanted one with a fairly classic shape. It has been my mission every time I go to the B (thrift store) or the ReStore to find a chandelier with potential minus the hefty price tag. This is what I came up with:


Don't be alarmed. There is a happy ending to this story.

One of the best things about this beauty? $5. That's right. Now one thing that I would recommend before you put a bunch of time and effort into making over your ugly duckling of a chandy--make SURE it works. I'm not quite speaking from experience (I was lucky) but I will tell you I almost had a heart attack from the anticipation as it was being hung. Like oh-goodness-what-if-i-just-spent-all-that-time-and-valuable-spray-paint-on-this-POS-and-now-the-darn-thing-won't-work type of heart attack. The kind where you hold your breath. But TA-DA!


Joy of all joys, it worked. Now here's what I did-

:: Gather supplies
             :: Chandy,
             :: spray paint
             :: wire (whatever gauge you prefer)
             :: cheap-o pearls ($.50 @the B)
             :: crystal looking beads (Hobby Lobby $5 (except they were 50% off God bless HL) so $2.50)
:: Wipe the thing down.
:: Put tin foil in the sockets to avoid getting paint on them...don't know if this matters, but I didn't want to chance it.
:: Spray Paint!! I used Krylon's Coral Isle. Perfection.
:: Prep your little dangle-y things (that's what she said...excuse me, I have been watching quite a bit of The Office lately). I threaded 4-ish beads on a wire and curled both ends of the wire into a circle to hold them on. You'll need as many of these as there are arms + 1 for the center. I made the center one with more beads.
:: Cut your pearl strands (mine were about 12" each)
:: Wire the pearls to the arms, and then to the middle (each Chandy is different, so it's hard to tell you how to do this part. Use your best judgement. I just made it up as I went along)
:: Add your little dangle-y crystals, and Voila! Cake easy.


And there you have it, folks.

P.s. Has anyone ever told you how hard it is to take a picture of lighting? I had about 80 pictures that turned out like this before I got a good one:


Have any of you done something fun with lighting lately?

Linking up to:


Somewhat Simple ThriftyThurs Thrifty Thursday Week 42
Transformation Thursday

HookingupwithHoH http://linesacrossmyface.blogspot.com/search/label/the%20Cure%20for%20the%20Common%20Monday

Monday, September 5, 2011

Shabby Door

I started a tradition of painting my door with the seasons last summer. I think it started out as just an ugly wooden door. Then I moved on to a bright orange for the summer (this was before I began taking before and afters of every minuscule change in my home. Thank you blogland. So no pic). And then I chose a REALLY beautiful plum color for fall. I mean, I loved it. So that is where the tradition ended due to my stubborn attachment to the aforementioned hue. Well with the ushering in of fall, my creativity was finally reignited...I give you my shabby door---


Oh man. I don't know if I'll really be able to start the tradition up again :\  I love this door!

So just so you have a frame of reference... BEFORE:


AFTER:


And again with my pretty fall wreath. (tutorial coming soon!)


Do any of you recognize the color? Remember Mustard Mishap? This is the product of that color choice...only I still added a ton of brown. Now I really love the color:) 

As I was painting, I decided that it would be really fun to do some distressing. I'm so happy with how it turned out! I just ordered a little detail sander on ebay two nights ago, so I ended up having to sand by hand (took forever). But now you can see a little of the plum through the yellow...


Oh! And I found this little number at the B (local thrift store) for $2, and Robin oh-so-kindly installed it for me.


Goodness I love you doorknob.

Thus ends my Sunday motivation. 


Linking up to:


http://linesacrossmyface.blogspot.com/search/label/the%20Cure%20for%20the%20Common%20Monday
Keeping It Simple Todays Creative Blog
Confessions of a Stay At Home Mommy
Join  us Saturdays at tatertotsandjello.com for the weekend wrap 
 up           party!

Saturday, July 23, 2011

A crap-ton of projects

Oh man peeps. I have had about a million things going on in my life this month. I have so many, SO MANY I TELL YOU projects in the works...hence the absence from blogging.

We are remodeling the upstairs of our house this month and trying to do it very quickly! I have set us a deadline of May 29 Robin's Mafia Themed Birthday Party and I am sincerely hoping it's done. Today is actually Robin's birthday. I got him a tie. I know it's boring, but the man is impossible to shop for. So he gets a nice green striped tie.

Here are a few random things that I have been up to lately:


This is a painting I did yesterday. It's for a dear friend that is moving to the Dominican Republic to teach! So she will always remember our beautiful mountains:)


I lettered this chalkboard for some good friends that opened a new restaurant (Punky's Smokehouse BBQ). I used chalk markers...they're the bomb.com. No smears!


I painted this mural for my sweet friend Lacee. She is having a baby girl in a little over a week!


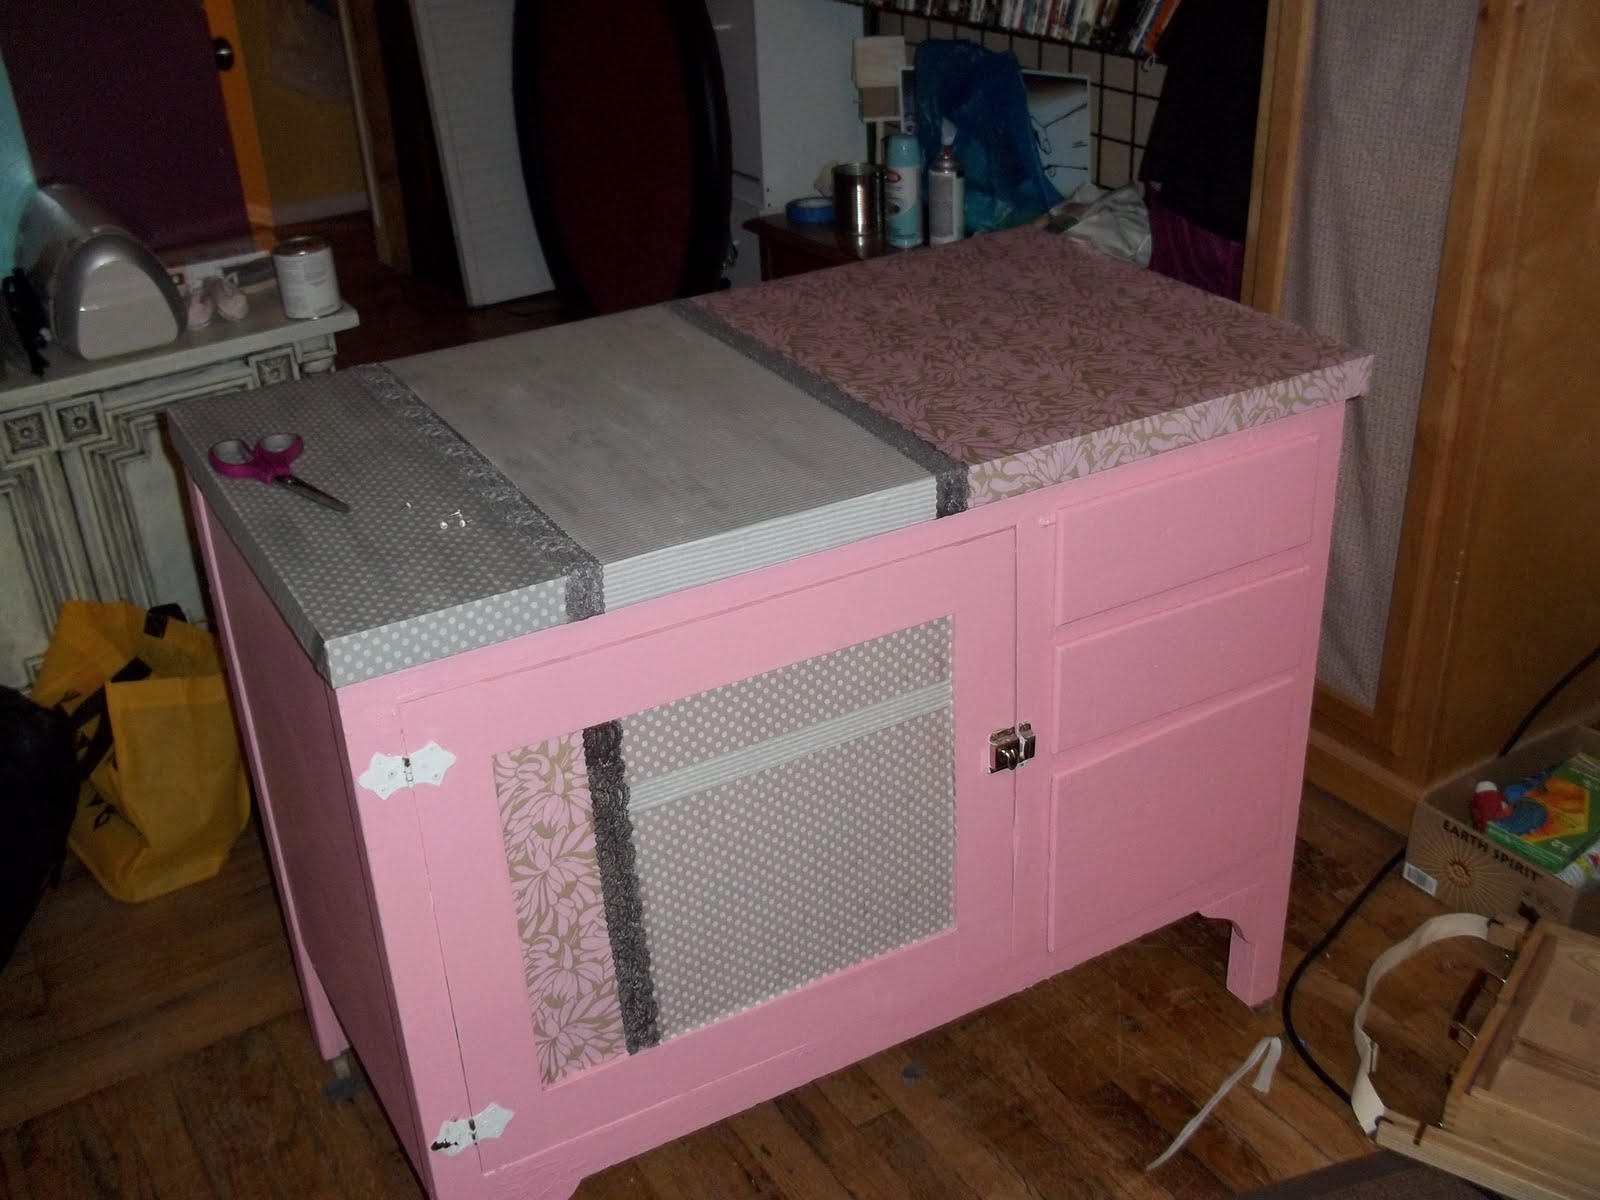
This is also her changing table. I just painted it pink and then mod-podged some fabric and trim on the top and front. SO cute in the nursery!


A dear friend and I were forced into volunteered to help renovate and revamp the 3-5 yr. old sunday school room at our church.  It is a "Colorado Cabin" theme...so cute.  This is the only picture that I snapped, but it came out stinkin awesome! These are the tree stump tables that I painted in various stages of completion. I'll try to post some of the finished room soon. 


I finally sat down and got a sewing lesson from my mom! A friend had given me her old sewing machine, and I had never even opened it until this past week. I have so many projects requiring spray paint at the moment, and when it snowed last week (in May, I might add) I decided it was time! This pillow was the byproduct. For a tutorial on how to make it (It's a removable pillowcase type thing...washable!) visit THIS SITE. 

My mom was the mastermind behind the ruched embellishment, and I think I would be horrible at explaining it, so...I won't;) Sorry, but if I tried, you wouldn't get it anyway. I'm that bad.


These are my new dining chairs (sitting on my turf. I know you're jealous)! That's right people. I am going to have a dining room! I give you permission to do a celebratory dance move. Go ahead, you know you want to.

This is what they looked like BEFORE:


I only have 2 done, and I have 6 more to go...some aren't pictured. If you look closely you can see the finery that is the palm tree fabric. Why did I ever think they needed a makeover? For a tutorial on reupholstering chairs, visit VINTAGE REVIVALS. Which is coincidentally my favorite blog ever. The chair in her post is a lot more difficult (not just a seat) but I think she gives some good pointers.

So this is just a sneak peek at the scheme of my soon to be dining room:) Stay tuned for the final product! 


I made this wreath for my mom for mother's day. I think it turned out cute and was super cheap. Plus it's homemade...mom's love that crap. I'm pretty sure she still has stuff that I made her from the 2nd grade. 

I just took a wreath form that I bought at a thrift store ($.25) and wrapped it in cream colored yarn ($3). Then I added hot-glued fabric rosettes on it (which I made out of scrunchies from Family Dollar), and then stamped 'happiness' on some cardstock and glued that on the bad boy too. Super easy!


Also, I started a pantry redo. This is the before shot. Please excuse me while I go cry in the corner.

I haven't finished it yet, so this is all you get for now...but let me just tell you...IT'S AMAZING!!


WHEW! I told you I have been busy! 


P.S. If you love reading my blog, don't forget to hit the follow button! I'd pretty much love you for it. Not even pretty much. I just would.